With the Cool Timeline Gutenberg Block, you can easily create and design beautiful timelines directly inside the Gutenberg editor, without using any shortcode. Just insert the block into your page or post and configure layout, style, and other options directly from the editor’s settings panel.
Add Timeline Block
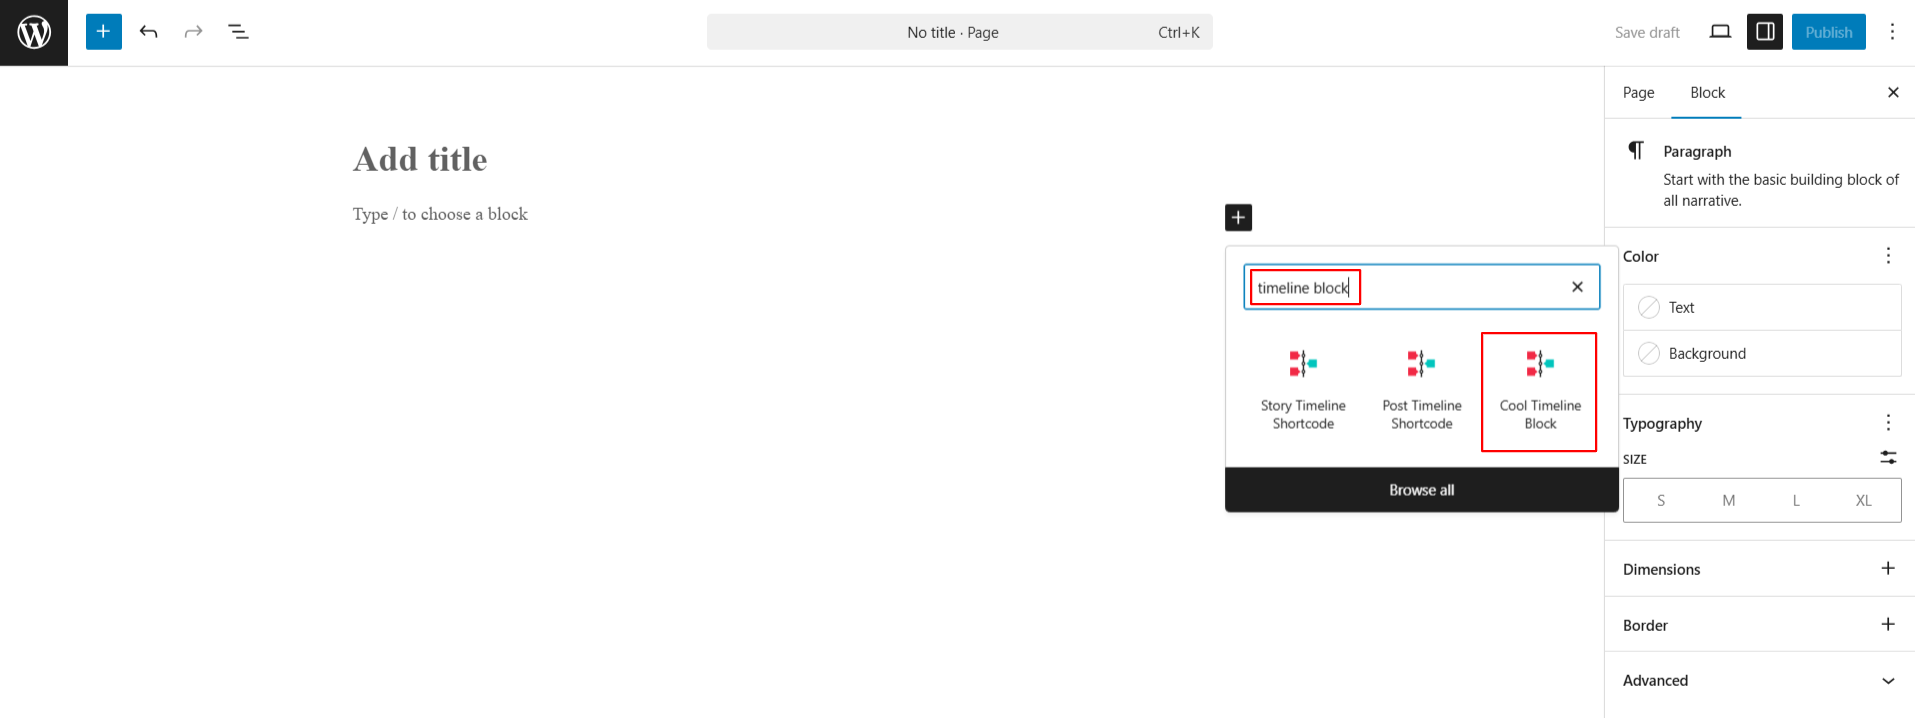
Follow these steps to add a timeline using the Gutenberg Block Editor:
- Navigate to the pages section in your WordPress dashboard. Add a new page or “edit” an existing one.
- Now, from the blocks section, search and add “Cool Timeline Block” to your page.
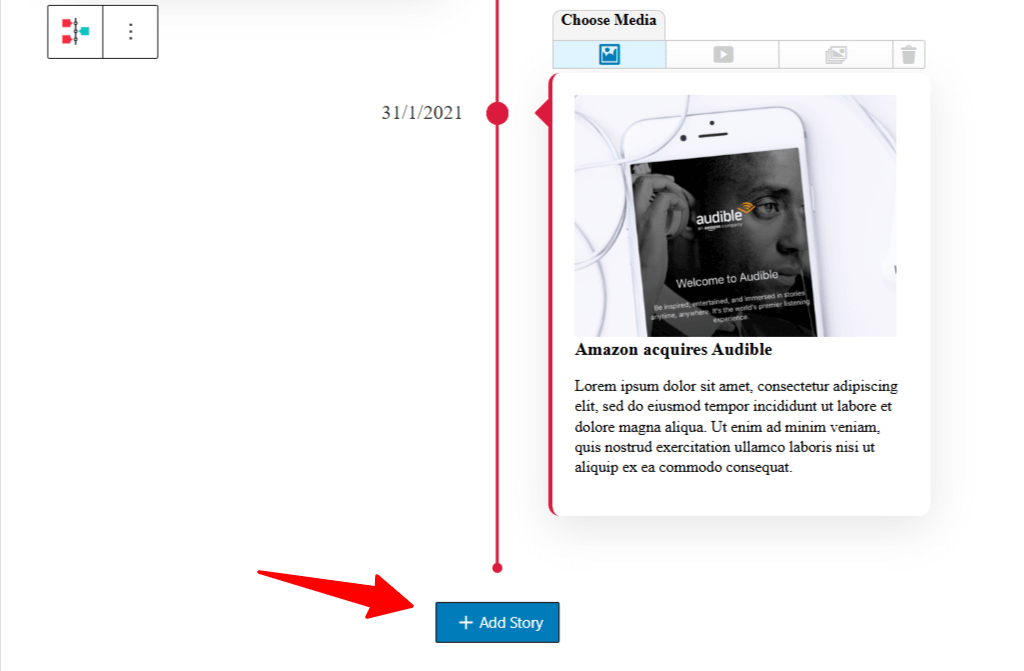
- Once added, you will see a default timeline structure appear on your page.
- You can now start adding timeline stories one by one. Each story will include a title, date, image, and description, which you can easily edit right inside the block.
- To embed images, videos, and slideshows within each timeline story, at the top of each story box, you’ll see a “Choose Media” option. This toolbar lets you pick the type of media you want to display.

Add a New Story
- To add a new story at the end, scroll down and click the + Add Story button. A new story block will be added.
- To change the order of a story, use the up and down arrow buttons on the story toolbar to move the block as needed.
- Additionally, to add a new story between existing blocks, you can click the plus (+) icon between two story blocks to insert a new one instantly.

Customize Single Story Block
If you want to customize a single story block, follow the steps below:
- Click on the story block you want to edit.
- The settings for that story will open in the right sidebar:
- Year Label (Show/Hide): Enable this option to display a year for the story.
- Year Label Text: After enabling the Year Label, enter the text.
- Primary Label: Set the main date, step, or heading for the story.
- Story Icon: You can add an image, text, icon, or a simple dot for the story icon.
- Story Position: Adjust the position of this story within the vertical layout.
- Read More Link: Enable the “Read More” link if you want to provide extra details or direct users to another page.
- Enter Your Read More Link: After enabling the Read More option, add the URL where users should be taken when they click the link.
Timeline Block Settings
If you want to apply customization to all story blocks and control how your timeline stories are displayed, then follow the steps below:
General Settings
From the General Settings tab, you can customize the layout, design, and alignment of your timeline.
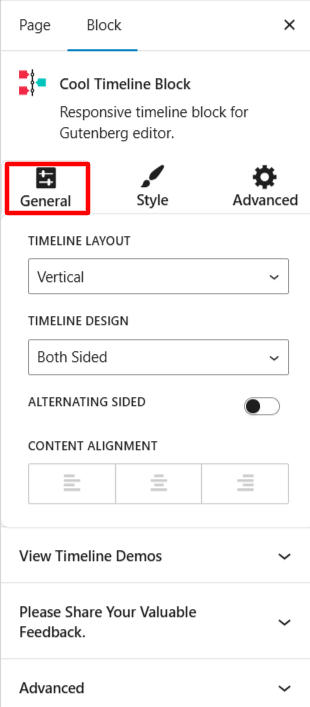
- Layout: Choose the timeline layout from vertical or horizontal.
- Timeline Design: If you have selected vertical layout, then choose whether you want a one-sided or both-sided timeline layout. If you have selected a horizontal layout, then choose design from default or simple for your timeline.
- Alignment: Choose the alignment of the timeline if using a one-sided layout: Left-sided or Right-sided.
- Content Alignment: Set how the text inside each story block should be aligned: Left, Center, or Right.
Style Settings
From the Style tab, you can customize fonts, colors, spacing, and padding for every part of your timeline.


- Story Heading: Choose the font style, size, weight, and spacing for story titles, customize the color for your story titles, add space around the story heading block (top, bottom, left, right), or add space inside the story heading box before the text begins.
- Story Description: Set the font and size of the main story content text, select a color for the story content text, and control the outer and inner spacing around the description area.
- Primary Label (Date/Steps): Customize how the date or custom labels (like “Step 1”) appear, and pick a color for this label to match your design.
- Year Label (Year/Text): Choose the font settings for the year label shown on the timeline, and set the color of the year label text.
Advanced Settings
Using advanced settings you can adjust the design of your timeline elements like icons, labels, center lines, media, and more.
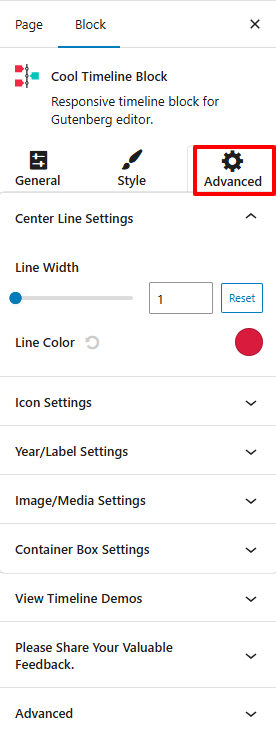
- Center Line Settings:
- Line Width: Customize the line width.
- Line Color: Pick the color for the center line.
- Icon Settings:
- Box Size: Set how large the icon box should appear.
- Font Size: Adjust the size of the icon inside the box.
- Box Radius: Control how rounded the icon box corners should be.
- Icon/Label Position: Shift the icon and label position using the slider.
- Background Color: Set the background color of the icon box.
- Font Color: Choose the icon text color.
- Connector Style: Select the line style that connects stories (Arrow, Line, or None).
- Year/Label Settings:
- Box Size: Set the size for the year or label box.
- Box Radius: Round the corners of the label box.
- Background Color: Set the background color for the year/label.
- Year Navigation: Toggle to add a year navigation bar.
- Image/Media Settings:
- Width / Height: Set custom image dimensions.
- Padding: Adjust space inside the image/media container.
- Margin: Add space outside the image/media container.
- Border: Define a border around images/media.
- Border Color: Pick a color for the image border.
- Container Box Settings:
- Margin: Add space outside the entire content container.
- Padding: Add space inside the container for better spacing around content.
- Border Width: Controls the border width around the timeline container.
- Border Radius: Adjusts the corners of the timeline container.
- Background Color: This sets the background color for the timeline container.
- Border Color: This sets the border color for the timeline container.
- Box Shadow: Add a shadow effect around the container.
- Timeline Animation: Implement animation effects to your timeline stories, like fade in, slide up, and 15+ more.
- After being satisfied with all the changes, publish the page and preview it.