Cool Timeline is an advanced WordPress plugin that helps you easily create timeline sliders for your website. You can use it to display your company’s history, product roadmaps, personal stories, or key events in a vertical or horizontal layout. Using Cool Timeline, you can create timeline stories in two ways:
- Shortcode-Based Timelines: Just add a simple shortcode to display your timeline on any page or post and customize it the way you like.
- Gutenberg Timeline Block: Add and manage timeline stories easily using the built-in block in the WordPress editor.
Try Free Version
Skip this step if you have already purchased the Pro version. The free version of Cool Timeline is available on the WordPress Plugin Directory and is active on 20,000+ websites.
How to Install Free Version:
- Log in to your WordPress dashboard.
- Navigate to the Plugins section.
- Search for the “
Cool Timeline” plugin. - Install
Cool Timeline. - Once the plugin is installed, activate it.

That’s it! Cool Timeline plugin is now installed and activated, and you can use it to create timeline stories for your WordPress website.
Download & Install Pro Version
Upgrading to the Cool Timeline Pro plugin unlocks the advanced features like access to multiple layouts, including Horizontal layout, Category-Based Timelines, Ajax Load More, Multimedia ( images, videos & slideshow), and more.
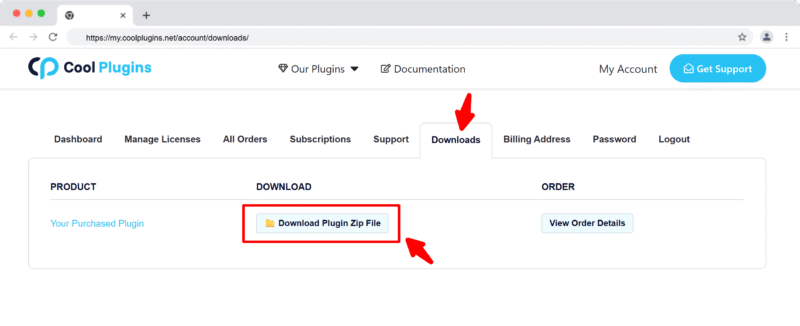
Where to Download Pro Plugin ZIP?
You can download the Pro plugin zip file in two ways:
- From Email – After purchase, check your inbox for the order confirmation email. It includes a download link.
- From Your Account – Log in to your Cool Plugins account and click the Download button.
Upgrade Free to Pro Version
Already using the free version? Here’s how to upgrade:
- Go to Plugins → Installed Plugins, deactivate and delete the free version.
- Upload and install the Pro version as explained below.
Note: When upgrading to the Pro version, you can safely deactivate or delete the free version without losing any of your existing form settings or data. However, make sure not to keep both the Free and Pro versions active at the same time, as this can cause plugin conflicts.
Install via WordPress Admin
- Log in to the WordPress Admin panel.
- From the left menu panel, go to Plugins >> Add New >> Upload the plugin.

- From here, choose the file you just purchased and downloaded, make sure the file is in (.zip) format.
- Click Install Now & Activate the plugin after installation.
Install via FTP Account
- To install the plugin, use your FTP software and browse to the wp-content/plugins folder.
- Extract the main plugin file (.zip) to the folder and upload it to the server.
- Once it’s uploaded, go to your WordPress admin panel and browse to Plugins >> Installed Plugins.