Using Timeline Widget For Elementor Plugin, you can easily show your existing posts inside a timeline layout without adding stories manually. The Post Timeline feature allows you to display your WordPress blog posts in a timeline format.
Add Post Timeline
Follow these steps to add a Blog Post Timeline inside Elementor:
- From your WordPress dashboard, go to the Pages section.
- Edit the page with Elementor where you want to display your post timeline.
- From the Elementor widget panel, search for Timeline.
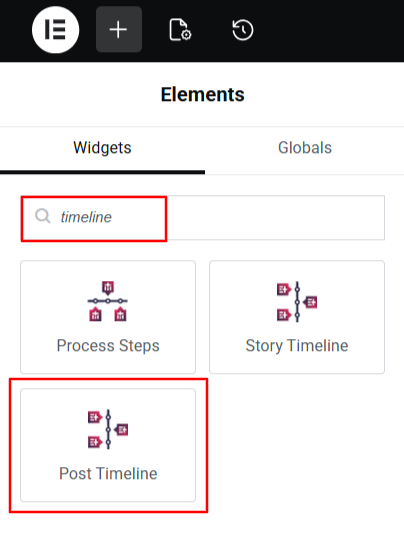
- Drag and drop the widget onto your page.
- A default post timeline will appear, showing your latest blog posts.
Post Timeline Settings
Once the Post Timeline widget is added, you can customize how your posts are displayed.
Timeline Query Settings
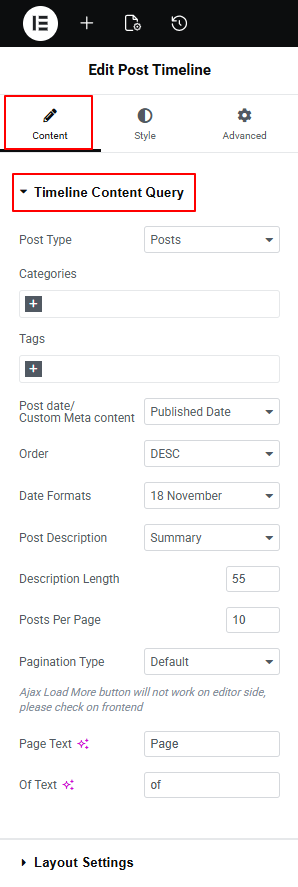
- Post Type: Choose which type of content you want to show in the timeline. By default, it is Posts, but you can also choose to display pages also.
- Categories: Select specific post categories to display. Only posts from the chosen categories will appear in the timeline.
- Tags: Filter posts using tags. When you add tags here, only posts with those tags will be shown.
- Post Date / Custom Meta Content: Choose whether you want to display post date or custom meta content in timeline.
- Order: Choose the order in which your timeline stories appear, from ASEC or DESC.
- Date Formats: Select how the date should appear on the timeline.
- Post Description: Choose whether you want to display Summary or Full content of timeline story.
- Description Length: Set how many characters of the post description should appear if you use a summary.
- Posts Per Page: Decide how many posts should load on a single page of the timeline.
- Pagination Type: Add default pagination and “load more” buttons to easily manage timelines with many stories.
- Page Text: Customize the word shown before the page number in pagination. Example: “Page”.
- Of Text: Customize the label shown between current and total pages. Example: 1 “of” 10.
Layout Settings
- Layout: Choose the layout for your timeline story according to your preferences.
- Preset Style: Apply a ready-made design to your timeline layouts.
- Connector Style: Choose the connector style for timeline stories.
- Display Icons: Choose the type of icons from custom or dot..
- Icon / Labels Position: Adjust the position of timeline icons and labels.
- Media Position: Choose where the image or media should appear: Top, Below Title, or Below Description.
- Image Size: Select the size of the image displayed in each story.

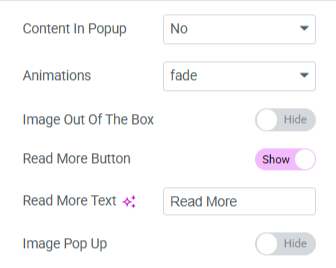
- Content In Popup: Enable this if you want the full story content to open in a popup instead of showing all content on the page.
- Animations: Choose the animation effect for how timeline items appear when scrolling.
- Image Out Of The Box: Enable this option if you want the image to appear slightly outside the box.
- Read More Button: Show or hide the “Read More” button below each story.
- Read More Text: Change the text of the “Read More” button to anything you like.
- Image Pop Up: Enable this if you want the image to open in a lightbox popup when clicked.
- After being satisfied with all the changes, publish your page and preview it.